This article elaborates on the steps needed to configure the Social25 package. We assume that the user that will do this has the following:
- a Social25 license
- the Social25 Admin Permission Set
- the necessary Salesforce permissions to:
- create Salesforce users
- create and assign Permission Sets
- create a Connected App
- assign Managed Package licenses
Create an Integration User
| Info |
|---|
Always use a dedicated API user for access to Social25. This is crucial as Salesforce is rolling out 2FA. |
- Create a user with a Salesforce user license and Standard User profile. Make sure the user has both a First name and Last name (e.g. 'Integration Social25')
- Reset the user's security token. It's easiest to do this in an anonymous browser, so you don't have to log out with your current user. You will need the security token in a later step so don't delete the email
- Create an 'API user' Permission Set with the following 4 characteristicspermissions:
- Under System Permissions:
- Api Enabled
- Api Only User (only available in Enterprise Edition)
- Password Never Expires
- Under Object Settings > Case
- Read and Edit access on the Account Name field and Contact Name field on the Case object (if you use the OOTB Social25 trigger for Case creation)
- Permissions Overview Standard Fields
- Under System Permissions:
- Assign this to the user created in step 1
- Create a 'Social25 Access' Permission Set. This one can remain empty and will be needed in the next step
- Assign the Social25 Access Permission Set to the API user, as well as to yourself
- Assign the Social25 Admin Permission Set to the API user, as well as to yourself
- Assign a Social25 License to the integration user and to yourself (only in Production)
- Go to Setup
- Go to Installed Packages
- Click Manage Licenses next to Social25
Create a Connected App
- Go to Setup
- Search for App Manager
- Click on New Connected App at the top
Fill in a Name and press the Tab key on your keyboard, this will auto-fill the API Name
Info The Name should be something else than Social25, so use Social25 Connected for example
- Fill in a Contact Email for your app
- Check Enable OAuth Settings (under API (Enable OAuth Settings)
Fill in the two required fields as follows
Callback URL
Selected OAuth Scopes Full access (full)
- Click Save
- Click Continue
- Click Manage
- Click Edit Policies
- Under OAuth Policies, make sure Admin approved users are pre-authorized
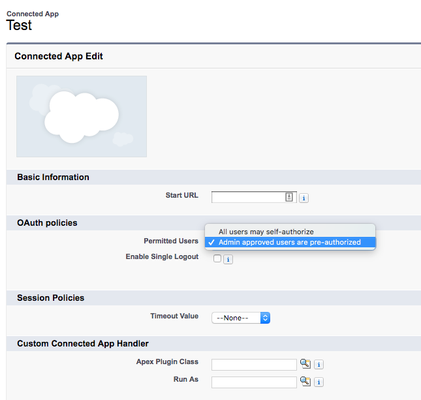
- Click Save
- Scroll down to the Permission Sets related list and add the Social25 Access Permission Set that you created earlier
Contact the Social25 team
After setting up the connected app, please provide the Social25 team with the following information. You can send this via email to support@gen25.com. After getting confirmation that your tenant has been setup in Heroku, you can proceed to the next section
| Key | Value | |||
|---|---|---|---|---|
| Salesforce Instance | Organisation ID | The 18 digit organisation ID of your Salesforce instance.
| ||
| Sandbox | Yes / No | |||
| My Domain | The My Domain URL of your Salesforce instance, if applicable | |||
| Integration User Salesforce Account | Username | The username of the integration user. Make sure this user has a First and Last name | ||
| Password | The password of the integration user (preferably this password does not expire). Please use this tool to share this and set expiration to a week | |||
| Security Token | The integration user's security token. Please use this tool to share this and set expiration to a week | |||
| Permissions | You don't have to provide anything here but make sure that the user has:
| |||
| Connected App | Consumer Key | In Setup, go to App Manager. Click on the arrow next to the Connected App you created earlier and select View. The Consumer Key is located under API (Enable OAuth Settings) | ||
| Consumer Secret | In Setup, go to App Manager. Click on the arrow next to the Connected App you created earlier and select View. The Consumer Secret is located under API (Enable OAuth Settings). Please use this tool to share this and set expiration to a week |
| Info |
|---|
If you are using a development or acceptance environment as well make sure to provide the credentials above multiple times for every instance that needs to be connected. ** Since the Social25 API utilises the Salesforce API it's highly recommended to set the disable the password expiration for these accounts |
Create a Social25 Config
| Info |
|---|
Please only proceed with this step once the Social25 team has confirmed that a tenant was created with the previously provided information. |
Every Social25 installation needs at least one Social25 Config record with an active configuration. In this section we will discuss all option available in the Social25 Config and what you can do with these settings
- Make sure you are in the Social25 app and have selected the Social25 Configs tab
- Navigate to the All list view to check for any existing configurations

- Select an existing record if needed, or click New to create a new one
- Edit the information according to the following table
| OVERALL | |||
|---|---|---|---|
Active Configuration | Every Social25 installation needs at least one active configuration to work properly | ||
| Configuration Name | This is the name of the Social25 configuration and is only used for easy identification | ||
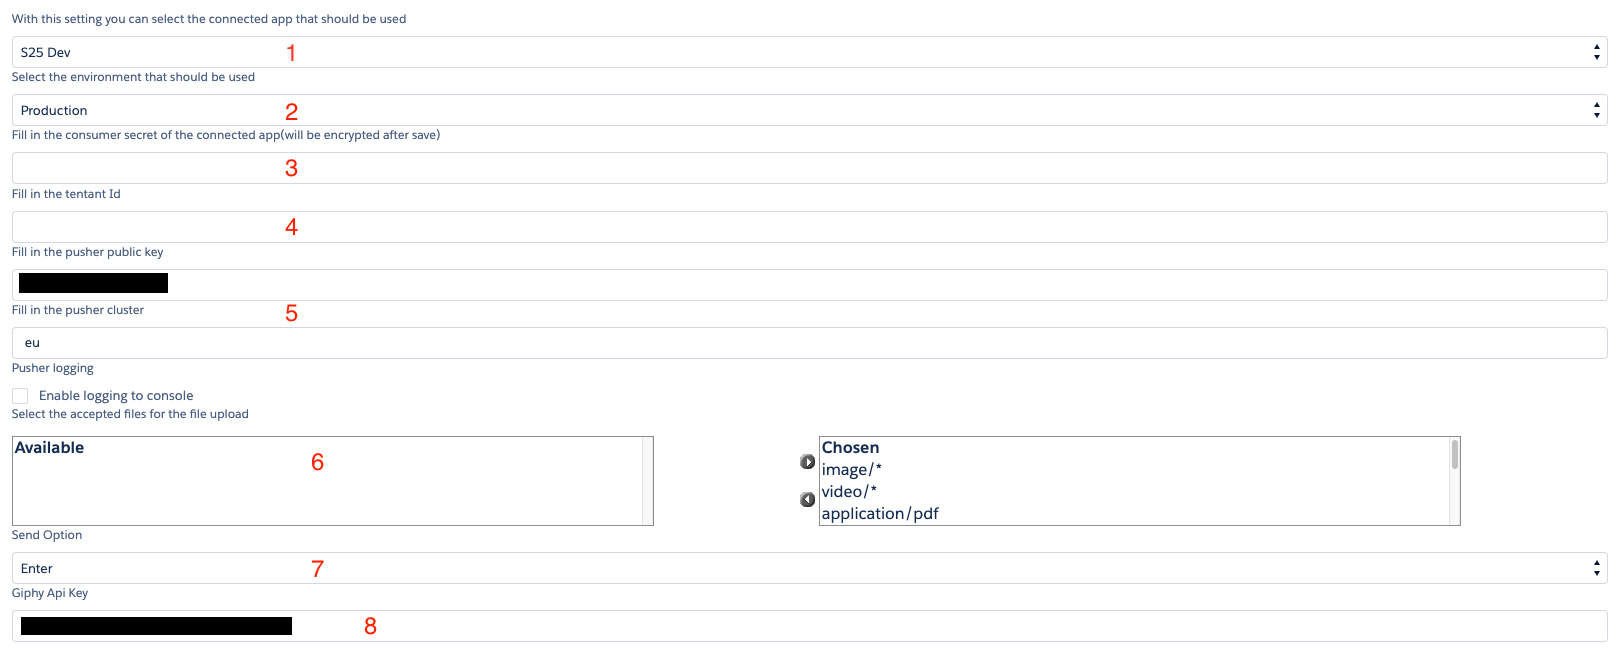
| Connected App | Specify the information as defined in the screenshot below:
| ||
| Social Persona | If your organisation uses the Salesforce Social Persona object -which comes with Salesforce Social Customer Service-, Social25 will use this object to create Social Personas. In order to do relate these Salesforce Social Personas to Heroku Messages, create a lookup on the Social25 Heroku Message object to the Salesforce Social Persona object and specify it in this field. If you do not have the standard Salesforce Social Persona object, Social25 will use its own Social25 Persona object to capture social profiles and will hide this field from the configuration page.
| ||
| LINK OPTION | Specify which object you want to use the Social25 chat canvas on. When a new message comes in, a record of this type will be created to which the conversation will be associated. Selecting None will only insert Social25__Heroku_Message__c records for each inbound/outbound message, allowing you to build any logic around this as fit. | ||
| LEAD / CASE / OPPORTUNITY LINKING SETTINGS | Specify settings specific to Leads, Cases or Opportunities. Also set a default value for any required fields.
| ||
| ACCOUNT SETTINGS | Specify Account and Contact specific settings and required fields |
| Info |
|---|
If you decide to utilise your own trigger logic, make sure to use None in the LINK OPTIONS |
Assign Social25 Licenses and Permission Sets
In order for users to use Social25, they will need the correct license and permission sets. Licenses are not required in a sandbox, so skip steps 2-4 when working in a sandbox.
- Go to Setup
- Go to Installed Packages
- Click Manage Licenses next to Social25
- Assign licenses accordingly
- Go to Permission Sets
- Assign the Social25 User and Social25 Access permission set accordingly
Heroku Message
The Heroku Message object is used for all inbound and outbound messages created on the Social25 platform. The only event on this object is the creation of new records. Records are never updated by the Social25 Heroku application. If you're developing custom triggers that trigger if a new message is received make sure to activate your trigger for this object. New incoming messages can be recognised by the Social25__Outbound__c field. A complete ERD of the Social25 package can be found on the Social25 Salesforce Sync page.
Social25 chat window
| Info |
|---|
The Lightning Component is only available in Salesforce Lightning Experience |
You can set up the Lightning Component as follows:
- Make sure My Domain is enable on your org, in order to allow Custom Lightning Components to be used: https://trailhead.salesforce.com/en/content/learn/modules/identity_login/identity_login_my_domain
- Edit the Lightning Record Page to which you want to add the chat window
- Add the Social25Messenger Lightning Component to your page
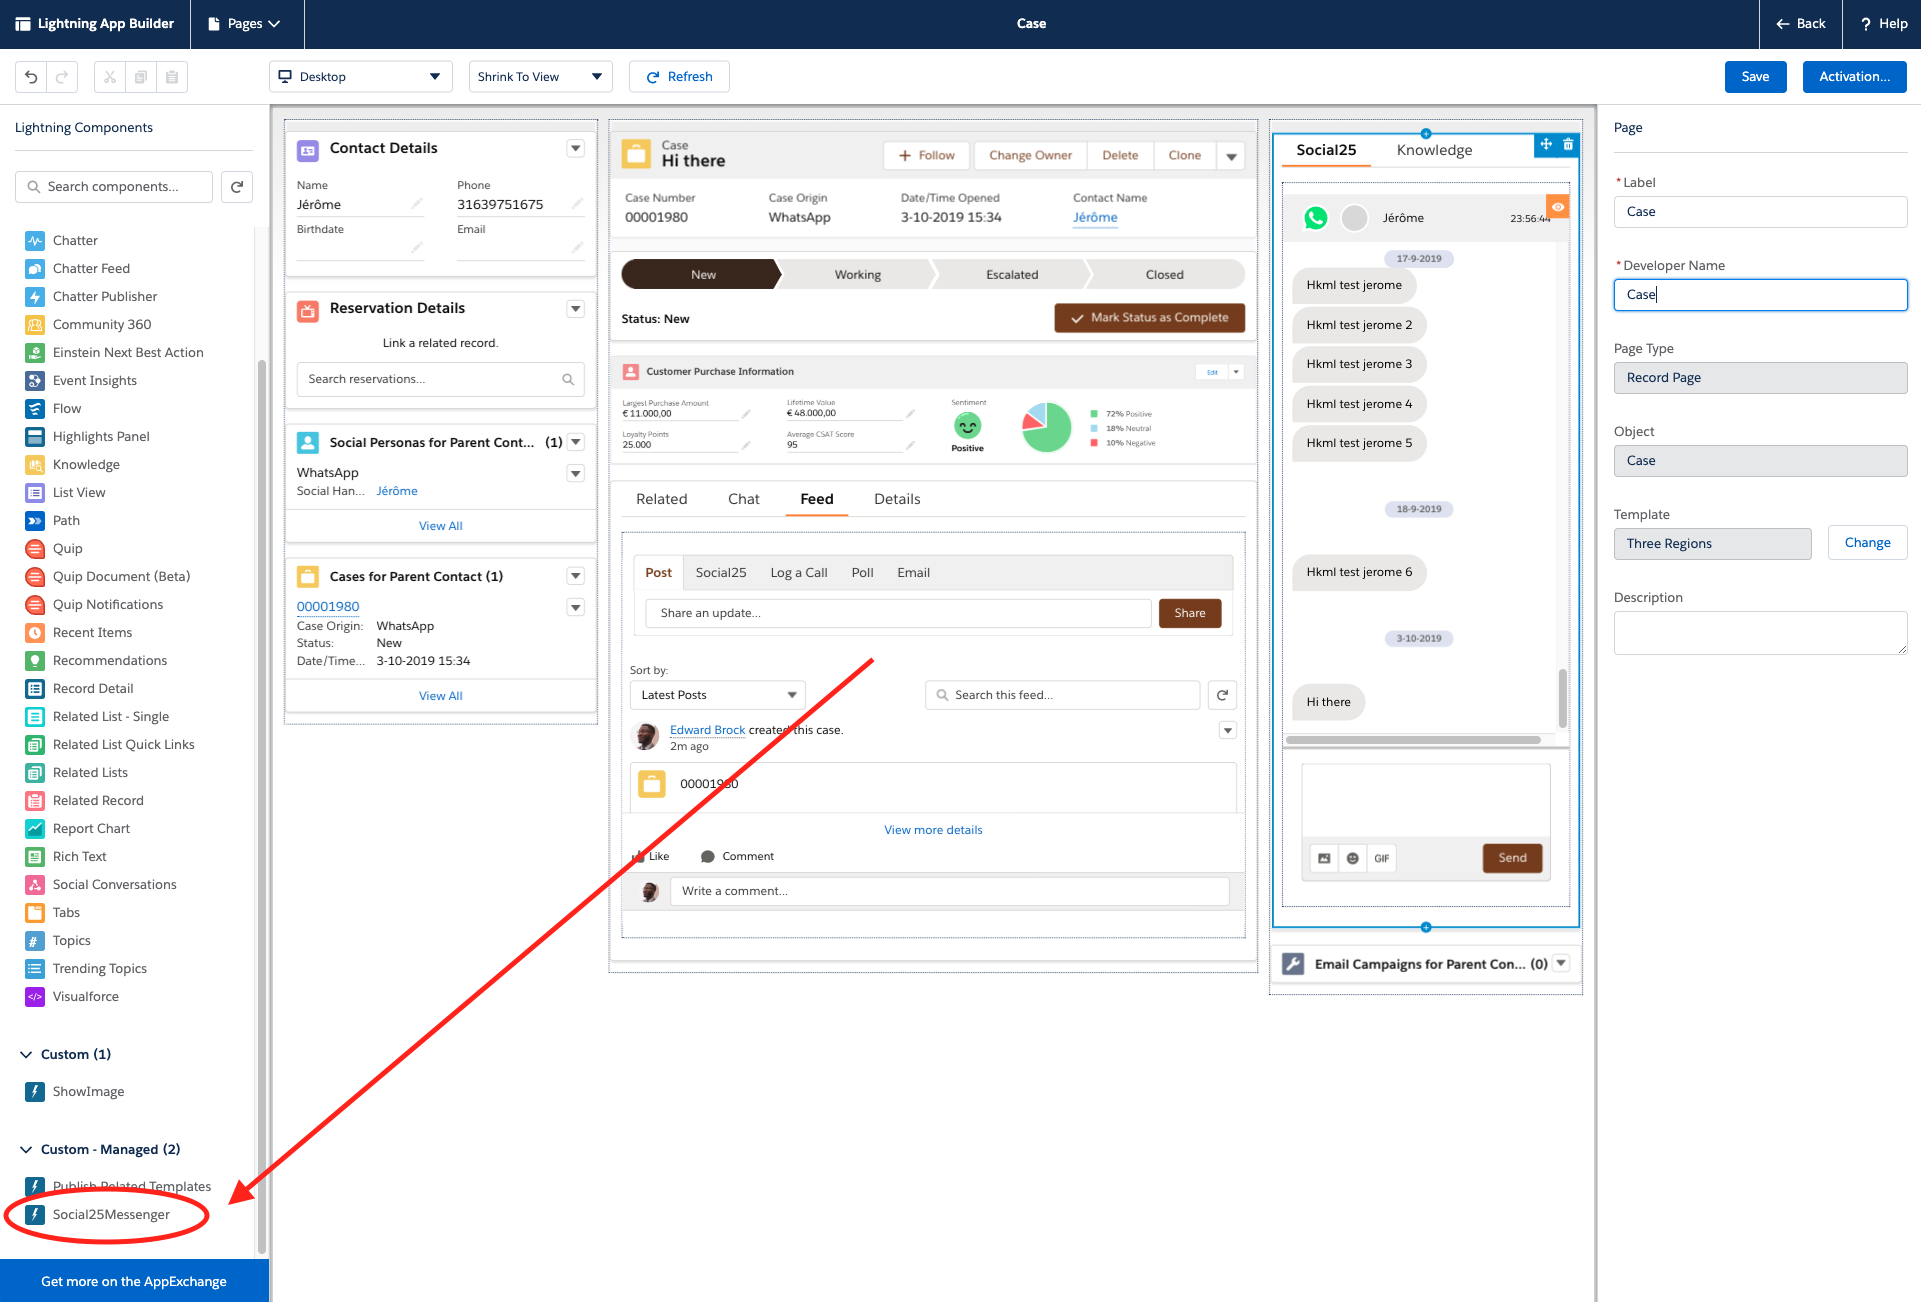
- Make sure to Save and Activate the page for your relevant Apps and Users
Related articles
| Filter by label (Content by label) | ||||||||||||||||||
|---|---|---|---|---|---|---|---|---|---|---|---|---|---|---|---|---|---|---|
|
| Page Properties | ||
|---|---|---|
| ||
|
| Panel | ||
|---|---|---|
| ||
|